
How to Face Paint a Tiger: Leanne Courtney's Step-by-Step Tutorial
Tigers are one of the most requested face painting designs at every event — from children's birthday parties to school fetes and festivals. They are bold, fast, and endlessly popular with kids of all ages. In this tutorial, Leanne Courtney — the Australian face painting artist behind Leanne's Collection by Fusion Body Art — walks through exactly how she paints a tiger using Fusion Body Art's professional water-activated paints, including the petal cake she specifically designed for this design.
Watch: Leanne Courtney's Tiger Tutorial
Watch Leanne demonstrate the full design — including her petal sponge loading technique, base application, white highlights, and stripe work — in real time.

What You Need
| Product | Role in the Design |
|---|---|
| Leanne's Flaming Tiger XL | The base coat — a petal cake designed specifically for tiger, dragon, fire, and warm-toned designs |
| Fusion Prime Paraffin White | White base option — opaque, solid coverage |
| Fusion Pearl Fairy White | Leanne's preferred white for tigers — shimmery, pearlescent finish that adds a subtle glow to the base and muzzle |
| Fusion Prime Strong Black | Stripes, nose outline, detail lines — rich, opaque, ideal for crisp linework |
| Fusion Petal Sponges | The primary applicator for the Flaming Tiger base — designed to fit the cake and load all colours in one pass |
| Leanne's Rainbow Round 3 | Stripes, nose outline, detail lines — the brush Leanne uses for tiger linework |
| Leanne's 5/8 Angle Brush | Eye area detail and curved strokes |
| Fusion Clear Mist Spritzer Bottle | Activating the paint — Leanne uses warm water and a fine mist spritzer to wet the petal sponge and cake surface |
About Leanne's Flaming Tiger
Leanne's Flaming Tiger XL is a Fusion Body Art petal cake — a shaped split cake that fits the Fusion petal sponge — designed by Leanne Courtney specifically for tiger, fox, dragon, and warm fire-toned designs. It runs from a deep red through orange into yellow, with each colour blending into the next across the sponge face in a single loading pass.
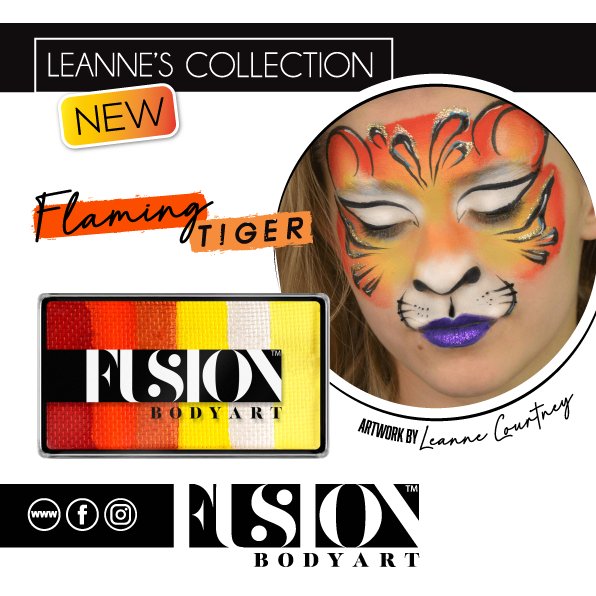
The petal shape means it loads onto the Fusion petal sponge in one pass — covering the full face in a single application rather than requiring multiple sponge loads. This is the quality that makes it particularly valuable at high-volume events where speed matters.
How to Load the Flaming Tiger Cake
The petal sponge sits into the Flaming Tiger cake with a small amount of overhang. Leanne's loading approach:
- Spritz the cake two or three times with the water bottle — you want the surface activated but not running.
- Place the flat face of the petal sponge onto the cake and load by moving it from side to side across the full width of the cake.
- Load from the yellow end first, then pick up just a little of the red edge — this gives you warm tiger tones with a deep edge for contrast without the red becoming dominant.
- Check the sponge face — you should see all the colour bands present. A little white showing through means you need one more loading pass.
- Load enough in one go to cover the whole face — Leanne loads the sponge fully so she does not need to return to the cake mid-design.
Step by Step: Painting the Tiger
Spritz the Pearl Fairy White using the Fusion Clear Mist Spritzer Bottle and load the clean side of the petal sponge. Apply across the forehead, around the eye area, and across the cheeks. Keep coverage light — you are laying down a shimmery base, not a full white mask. Leanne keeps the design from the nose upward, avoiding the mouth area so designs stay intact while children eat.
Spritz the Flaming Tiger cake once or twice with the spritzer bottle, then flip to the loaded Flaming Tiger side of the sponge. Using the curved corner, pat — do not drag — the colour into shape across the face. Work the forehead and brow area first, bring the colour around the eyes, down the cheeks, and taper it at the chin. Pat the sponge across the nose area. Use the corner of the sponge to shape the ears — a rounded arch at the top of each ear.
Return to the Pearl Fairy White for the muzzle area — the upper lip area below the nose. Keep it to a soft oval shape and do not extend all the way to the corners of the mouth. Add a small amount of white to the inner ears. Leanne also lightens the area just inside the corner of each eye with a touch of Pearl White — this lifts the design and adds dimension.
Load Leanne's Rainbow Round 3 with Fusion Strong Black. Press the brush at the tip of the nose and work outward to shape each nostril, then pull the outline together at the centre. Keep it compact — Leanne notes a smaller nose always reads more naturally on a tiger than a large one, and this is the most challenging element to paint when working in a mirror on yourself.
This is where the design transforms. Leanne's stripe technique using the petal brush or round brush:
Leanne's technique for stripes is what she describes as the angle-push method — place the brush at an angle, push sideways to create the thick body of the stripe, then twist and lift to taper the end into a point. This produces the natural thick-to-thin shape in one motion rather than requiring separate strokes.
- Start on the less confident side of the face first — you can then mirror it on the more confident side.
- Place the brush at an angle near the outer edge of the face.
- Push the brush sideways to create the thick body of the stripe.
- Twist and lift to taper the end — the natural thick-to-thin tiger stripe in a single motion.
- Work from the outer edges of the face inward — two or three stripes per cheek, one or two on the forehead between the brows.
- Stripes do not need to be perfectly even — real tigers are not symmetrical.
From the corners of the nose, follow the natural lines of the face downward toward the corners of the mouth — but stop short, do not paint around the mouth itself. Add a fine line from the centre of the nose to the upper lip. A couple of short upward lines above the muzzle area for whisker dots complete the design. Optional: add black eyeliner along the upper lash line.
Leanne's Tips for Painting Tigers at Events
- Load the sponge fully before starting. Load enough paint for the whole face in one go — going back to the cake mid-design breaks your rhythm and slows you down at busy events.
- Keep it above the nose. Leanne avoids painting around the mouth area when working with children at events — it keeps the design from smudging when they eat and drink, and reduces the risk of paint getting into the mouth.
- Paint your weaker side first. Always start the stripes on the side of the face you are less confident with. You can then match and balance the stronger side to it — much easier than trying to replicate a perfect side on your weaker side.
- Use a fresh sponge per client. Load a fresh petal sponge for each new face — it keeps the Flaming Tiger colours clean and prevents white or other colours from contaminating the warm tones.
- Warm water activates the paint faster. Leanne uses warm water in her container — it helps Fusion Body Art's water-activated formula activate more quickly, which matters when you have a long queue.
- It does not have to be perfect. Leanne is characteristically honest about this: "Doesn't matter even if they're not neat — that's pretty cool." Slight imperfections in stripes read as natural tiger markings from any distance greater than arm's length.
How to Turn a Tiger Into a Fox
The same Leanne's Flaming Tiger petal cake from Fusion Body Art works for a fox design with two small changes. Leanne identifies this mid-tutorial and it's genuinely useful for building a fast, versatile event menu from a single cake.
- Make the ear shape more pointed rather than rounded.
- Add more white to the arch (inner) side of each ear and extend it further down the cheek.
- The warm orange-to-yellow tones of the Flaming Tiger are perfect fox colouring — no change to the base colour needed.
- Replace tiger stripes with the simple face markings of a fox — a white blaze down the nose centre and a white lower muzzle area.
One loaded sponge, two designs. At a busy event, being able to offer tiger or fox from the same cake doubles your options without adding any setup time.
Frequently Asked Questions
What do you need to face paint a tiger?
To face paint a tiger you need a split cake in warm tiger tones — Leanne's Flaming Tiger from Fusion Body Art is designed specifically for this — a petal sponge to apply the base, white face paint for the muzzle and highlights, black face paint for stripes and outlines, a round brush for detail work, and a water spritzer. Warm water in your container helps activate the paint faster.
How long does it take to face paint a tiger?
An experienced painter using the petal sponge and split cake approach can complete a full tiger design in approximately 90 seconds to 2 minutes. Leanne Courtney notes in her tutorial that the whole design takes about a minute and a half when she is not simultaneously talking to camera. With practice and a pre-loaded sponge, tigers are one of the fastest full-face designs you can offer.
What colours do you need to paint a tiger face?
Warm orange and yellow tones for the base, white for the muzzle and inner ear highlights, and black for stripes, nose, and detail lines. Using a split cake like Leanne's Flaming Tiger that contains these warm tones together means the entire base can be applied in a single sponge stamp rather than multiple colour applications.
How do you paint tiger stripes?
Load a round or petal brush with black face paint. Place the brush on an angle near the outer edge of the face, push it sideways to create the thick body of the stripe, then twist and lift to taper the end. This produces the natural thick-to-thin stripe shape in one motion. Always start on the side of the face you are less confident with so you can mirror and balance the stripes on the stronger side.
What is the best split cake for a tiger face paint?
Leanne's Flaming Tiger XL by Fusion Body Art — it is a petal cake designed specifically for tiger designs, containing graduated warm tones from deep red through orange to yellow. The petal shape loads onto a Fusion petal sponge in one pass, covering the whole face in a single application. The same cake also works for dragons, foxes, fire effects, and autumn-themed designs.
Can you turn a tiger into a fox with the same paint?
Yes. Leanne notes this directly in her tutorial. The Flaming Tiger base is the right colour for a fox. The key changes are making the ear shapes more pointed, adding more white to the inner ear and extending it down the cheek, and replacing the tiger stripe markings with simpler fox face markings. One cake, two designs.
Do you paint the nose or stripes first on a tiger?
Apply the coloured base with the sponge first, then add the white muzzle and highlights, then the black stripes, nose, and detail lines last. Leaving all the black detail work until the end means you can adjust the coverage and shape of the base before committing to the outlines.
What brush is best for tiger stripes?
Leanne uses Leanne's Rainbow Round 3 for stripe detail work, nose outlines, and fine linework. Her 5/8 Angle Brush works well for the eye area and curved strokes. The petal brush is also effective for stripes because its shape — thinner at the tip, wider in the middle — naturally produces the tapered thick-to-thin stripe in one stroke.
Shop the Products Used in This Tutorial
All products used by Leanne Courtney in this tutorial are available from Fusion Body Art:
→ Leanne's Flaming Tiger XL — the petal cake designed by Leanne for tiger, dragon, fox, and fire designs
→ Fusion Pearl Fairy White — shimmery white for the tiger base and muzzle highlights
→ Fusion Prime Paraffin White — solid opaque white alternative for the base
→ Fusion Prime Strong Black — rich, opaque black for stripes and detail
→ Fusion Petal Sponges 6 Pack — the applicator Leanne uses with the Flaming Tiger cake
→ Fusion Clear Mist Spritzer Bottle — Leanne's water spritzer for activating the petal cake and sponge
→ Leanne's Rainbow Round 3 — Leanne's brush for tiger stripes, nose outline, and detail work
→ Leanne's 5/8 Angle Brush — for eye area detail and curved stroke work
Browse Leanne's full collection at fusionbodyart.com


