
How to Use Split Cakes for Face Painting: The Complete Guide
Split cakes are one of the most transformative tools in face painting. A single sweep of a loaded brush produces a perfectly blended, multi-colour stroke that would take minutes to recreate with individual colours — and with practice, they allow you to paint professional-looking designs in a fraction of the time. Whether you are a beginner picking up a flat brush for the first time or an experienced painter looking to sharpen your technique, this guide covers everything you need to know.
What Is a Split Cake?
A split cake — also called a one stroke cake — is a face painting cake made up of multiple colours arranged in parallel bands within a single container. When you load a flat or angle brush across the surface of the cake, you pick up all the colours at once, allowing them to transfer onto the skin in a single stroke with smooth, natural transitions between each colour.
The name comes from the physical structure: the paint inside is divided — split — into distinct colour sections that sit side by side without mixing until a brush is drawn across them. "One stroke" describes the technique rather than the product — the ability to lay down multiple colours simultaneously in a single brush motion. Many painters use both terms for the same product, which is technically accurate: the cake enables the technique.
Fusion Body Art split cakes are made with the same cosmetic-grade, FDA and EU compliant pigments used across their entire range — the colours are vivid, the transitions between bands are clean, and they are specifically formulated to hold their separation on the brush rather than blending into mud.
Watch: Fusion Body Art Split Cakes in Action
This Fusion Body Art video shows their split cakes being used with a range of designs — a great visual reference for seeing how the colours load and apply.
What You Need to Get Started
The Right Brush
The brush is the single most important factor in how well your split cake performs. The wrong brush will muddy your colours before they ever reach the skin.
| Brush Type | Size | Best For |
|---|---|---|
| Flat brush | 1" (most versatile) | Full-width strokes — flowers, butterflies, rainbow crowns, large cheek art |
| Flat brush | ¾" | Medium designs — eye masks, smaller flowers, detailed cheek art |
| Angle brush | ¾" or ½" | Petals, leaves, teardrops, curved strokes — great for precision work and curved designs |
| Petal brush | Varies | Specialist petal and leaf shapes — each stroke produces a complete petal form |
| Small flat brush | ¼"–½" | Picking up individual colours from the outer edges of a split cake for fine detail work |
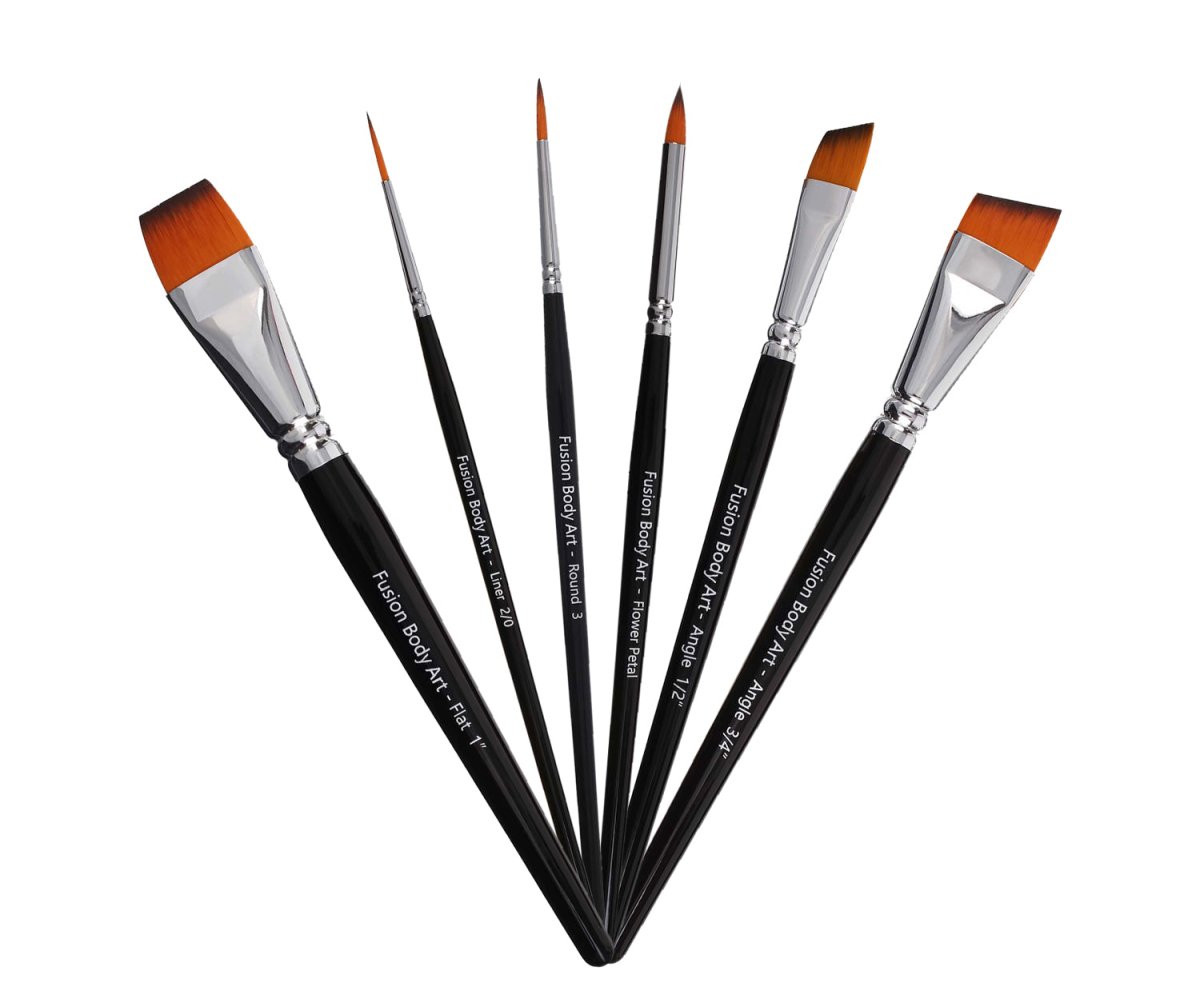
For beginners, a ¾" or 1" flat brush is the recommended starting point — the ¾" flat gives slightly more control for smaller designs while still spanning the full width of most Fusion split cakes, and the 1" flat is ideal for large sweeping strokes across eye masks, rainbow crowns, and full-face elements. Both sizes are included in the Fusion Body Art Professional Brush Set of 6, which is designed specifically for use with their split cake range.
Water Control
Water is the single variable that separates clean, vivid split cake results from muddy ones. The gap between the right amount and too much is surprisingly small — which is why most beginners struggle at first. Your brush should feel uniformly damp when you touch the bristles to your palm, without any water releasing under light pressure. Think of it like a wrung-out cloth: thoroughly damp, nothing dripping.
Keep two separate water containers on your table at all times — one for rinsing brushes between colours, one that stays clean for activating paint. Once your rinse water turns grey, it is time to change it. Contaminated water transfers pigment back onto your cakes and dulls every colour you pick up after it.
How to Load a Split Cake: Step by Step
Loading technique is the foundation of everything that follows. The same split cake that produces muddy results for one painter will produce vivid, clean strokes for another — the difference is almost always in how the brush is prepared before it touches the cake.
- Prepare your brush moisture level first. Dip your ¾" or 1" flat brush fully into clean water, then press the flat face of the bristles firmly against a folded paper towel — not the tip, the full flat face. Repeat once or twice until the brush no longer releases water under gentle pressure but still feels evenly damp throughout the bristles.
- Position the cake so the colour bands run perpendicular to your brush direction. Most painters hold the cake level and sweep the brush across it horizontally. What matters is that the brush crosses all colour bands with each pass rather than running parallel to them.
- Make several passes across the full width of the cake. Long, even sweeps from one edge of the cake to the other — not short scrubbing motions. Each pass should glide smoothly rather than drag. You are building up a layer of paint on the bristles, not scraping paint off the cake. Continue until the bristle face shows a clear, even layer of paint across every colour band.
- Inspect the loaded brush before touching a client. Hold the brush up and look at the flat face of the bristles — the colour bands should be visible and distinct. A fully loaded brush looks almost like a tiny version of the split cake itself. If everything has merged to one tone, the brush was too wet. Blot it out and start again.
- Paint with intention. Place the brush where the stroke begins, move with consistent pressure and speed through the entire stroke, and lift cleanly at the end. Stopping mid-stroke, reversing direction, or pressing harder at the end are the most common causes of uneven results.
Brush Angle and Stroke Technique
Loading the brush correctly is only half the technique. How you hold and move the brush on the skin determines whether the colours stay separated and vivid, or blur and collapse into each other.
Brush Angle to the Skin
Hold the flat brush at approximately 45 degrees to the skin surface — not flat against it, not upright. Flat to the skin spreads the bristles and loses colour separation. Upright uses only the tip and loses the benefit of having all colour bands loaded. At 45 degrees the full flat face of the bristles contacts the skin evenly, transferring all bands simultaneously with each stroke.
Pressure
Use consistent, light-to-medium pressure throughout the stroke. Pressing harder mid-stroke flares the bristles and widens the stroke unpredictably. Releasing pressure at the end produces a thin, faded tail. The stroke should feel the same from start to finish — treat the brush like a pen moving at even speed across the page.
Stroke Direction
Think about which direction your stroke runs relative to the design before you begin. For a butterfly wing, the stroke arcs outward from the nose. For a petal, it pulls from the outer edge toward the centre. For a rainbow crown, it sweeps across the forehead in a single arc. The direction of your stroke determines where the colours land — since the brush carries all bands simultaneously, rotating the brush changes which colour appears at the leading edge versus the trailing edge of your stroke. A few practice strokes on paper before painting a design on skin is always worthwhile.
Lifting the Brush
Lift cleanly and decisively at the end of each stroke. Slowing down or hesitating before lifting drags the trailing colours back through the leading ones and muddies the endpoint. Think of the lift as part of the stroke itself — planned before the brush touches the skin, not decided after the paint is down.
Common Mistakes and How to Fix Them
| Problem | Cause | Fix |
|---|---|---|
| Colours all blending into one muddy tone | Too much water on the brush | Press the flat face of the bristles against a paper towel more firmly before loading. The brush should feel damp when touched, not release water under pressure |
| Paint not transferring to skin | Too little water, or under-loaded brush | Make more loading passes across the cake surface. If paint still does not transfer, add one small press of moisture to the brush and load again |
| Colours bleeding into each other on the cake surface | Water applied to the cake rather than the brush | Wet only the brush — never the cake directly. If the surface has become waterlogged, leave the cake open to dry before using it again |
| Strokes look uneven or streaky | Variable pressure or speed through the stroke | Commit to a single consistent motion from start to finish. Practise the stroke on paper first to build muscle memory before applying to skin |
| Only picking up one or two colours, not all bands | Brush narrower than the cake, or loading off-centre | Ensure each loading pass covers the full width of all colour bands. Use a wider brush or load from both edges of the cake alternately |
| Colours fading or disappearing mid-design | Under-loaded brush running out of paint | Reload more frequently. For long flowing strokes, it is better to reload partway through than to thin out the paint and lose the colour separation |
Using Fusion Petal Sponges with Split Cakes
While the flat brush is the primary tool for split cake work, Fusion Petal Sponges open up a completely different technique — and are one of the fastest ways to produce professional-looking designs at high-volume events.
Fusion Petal Sponges are shaped like a leaf or petal. When loaded across a split cake and stamped onto the skin, each press produces an instant petal or wing shape with automatic colour graduation built in — the gradient happens because of the way the colours sit across the sponge face, not because of any blending technique on your part.
How to Use a Fusion Petal Sponge with a Split Cake
- Dampen the sponge lightly — the same rule as the brush: damp, not wet. Press the sponge face against a paper towel to remove any excess moisture before loading.
- Press the flat face across the split cake — sweep the sponge across all colour bands in one smooth motion. You should see all the colours transferred evenly across the face of the sponge.
- Stamp firmly onto the skin once — press down with even pressure and lift cleanly. Do not drag or rock the sponge — a single clean press and lift produces the sharpest petal shape. Dragging immediately collapses the colour separation.
- Reload for each stroke — unlike a brush which holds several strokes of paint, a petal sponge typically needs reloading after each stamp for best colour intensity.
- Use one sponge per cake — do not use the same petal sponge across different split cakes without rinsing first, or the colours will cross-contaminate.
Petal sponges are particularly effective for butterfly wings, flower petals, and any design where you want a defined shape with built-in colour graduation. A butterfly can be completed in two stamps per wing — faster than any brush technique for the same result.

→ Fusion Body Art Petal Sponges 6 Pack — available in standard and charcoal black. An essential applicator for butterfly wings, flower petals, and fast cheek art with split cakes.
How to Practise Before Your First Event
Understanding split cake technique and executing it cleanly on a real person are two different things. The gap between them is practice — and the most efficient way to close it before an event is a structured approach rather than random experimentation.
Start on Paper
Load the brush and paint strokes across a sheet of white paper or card. Paper gives you immediate feedback — you can see the colour separation clearly, adjust your water level between strokes, and build consistency without the pressure of someone sitting in the chair. Do this until you can produce 10 consecutive strokes with clean colour bands and no muddying before moving to skin.
Use a Practice Board
Face painting practice boards — laminated sheets printed with face outlines — let you paint full designs in sequence without needing a model. Load the split cake and paint the same design repeatedly until the stroke pattern becomes automatic. At events, speed comes from muscle memory, not conscious thought. The goal is to practise each design until it happens without planning.
Master Five Designs Before Adding More
Before working through your full design menu, master five core designs: a flower, a butterfly, a rainbow crown, an animal stripe, and a simple eye mask. These five cover the fundamental stroke patterns used across most one stroke face painting. Once these are consistent, every other design is a variation on what you already know.
What Designs Can You Create with Split Cakes?
The real power of a split cake becomes clear when you see how many designs are achievable with just a few strokes. Here are the designs that professional face painters most commonly execute with split cakes:
Flowers and Petals
The most iconic split cake design. A single petal is one stroke — load the brush, press to the skin at the widest point of the petal, drag toward the centre, and lift. Five to six strokes and you have a complete flower. The colour variation from a split cake gives each petal natural depth and dimension that would take minutes to achieve with solid colours.
Butterfly Wings
Each wing is a single curved stroke — load the ¾" flat brush, press it to the skin at the widest point of the wing, arc outward and upward, and lift cleanly. Do the same mirrored on the other side. A thin black body between them and the design is complete. What makes split cakes so effective for butterflies is that the colour graduation across the wing happens automatically — what would require multiple colours and blending time with solid paints is done in a single stroke per wing. One of the most reliable high-volume designs in any professional kit.
Rainbow Crowns
A single arched stroke across the forehead using a 1" flat brush loaded with a rainbow-coloured split cake. Add small flowers or stars at each end and you have a complete crown. The speed of this design — under a minute for experienced painters — makes it ideal for high-volume events.
Tigers and Animal Stripes
Load the brush on a warm-toned split cake (orange, yellow, white) and apply short, curved strokes for tiger stripes. The natural variation in colour across the brush creates the shading in each stripe with no additional work.
Dragon Scales and Snakes
Use a small angle brush loaded on a green or teal split cake to create overlapping crescent strokes. The colour graduation gives each scale or segment natural depth, making the design look intricate even when painted quickly.
Eye Masks
Sweep a loaded 1" flat brush outward from the nose across the eye area in a single flowing stroke for each side. The colour variation gives the mask natural shading from inner to outer corner. Add detail with round brushes and black and white for a complete design in under 3 minutes.
Cheek Art
Any flower, butterfly, star, or swirl design works beautifully as a quick cheek art piece using split cakes. The speed advantage of the one stroke technique is most obvious in high-volume cheek art — designs that might take 4–5 minutes with individual colours take 60–90 seconds with a well-loaded split cake.
Choosing the Right Fusion Body Art Split Cake for Each Design
The colour combination in your split cake determines what designs it naturally suits. Choosing the right cake before you start saves time and produces better results than fighting a colour combination that does not suit your design.
| Design Type | Colours to Look For | Examples from Fusion Range |
|---|---|---|
| Flowers, roses, feminine designs | Pinks, purples, whites, reds | Bold Rose, Wild Berry, Rose Princess |
| Butterflies, unicorns, princess designs | Pastels — lilac, pink, sky blue, white | Snow Queen, Flower Fields, Frozen Queen, Unicorn & Fairy kit cakes |
| Tigers, lions, fire, dragons | Oranges, yellows, reds — with black edge | Fire Flames — the go-to for all things fiery. For dragons with colour also try Jungle Snake for green dragon scales |
| Snakes, leaves, vines, nature | Greens, teals, yellow — with black edge ideal | Jungle Snake (built-in black outline edge — saves outlining time), Shamrock Candy |
| Ocean, mermaid, sea designs | Blues, teals, aqua, greens | Sea Creatures, Frozen Queen, Ocean Breeze |
| Furry animals — cats, dogs, bears | Browns, creams, greys, soft warm tones | Furry Critters — designed specifically for one stroke animal designs |
| Rainbows, bright cheek art | Full spectrum — warm through cool | Leanne's Rainbow, Leanne's Rainbow, |
Advanced Split Cake Techniques
Once brush loading is consistent and your basic strokes are clean, these techniques expand what you can achieve with each split cake in your kit.
| Technique | When to Use It | Effect |
|---|---|---|
| Partial loading | When you want 2–3 colours from a cake rather than all bands | More control over colour range per stroke; useful for smaller designs |
| Combining two cakes | Warm tones for one design element, cool tones for another | Richer, more complex designs without muddying a single cake |
| Rotating mid-stroke | When colour orientation needs to change between elements | Mirror-image strokes where each side has the gradient reversed |
| Flat edge line work | Stems, veins, fine detail with colour variation | Multi-coloured fine lines without switching brushes |
| Worn edge single colour | When a cake is nearly finished | Extracts the last usable colour for outlines — zero waste |
Loading Only Part of the Cake
You do not always need to load the full width of the brush across the entire cake. Using a smaller brush and loading only one edge of a split cake allows you to pick up a partial colour range — useful when you want two or three colours rather than the full spectrum, or when you want to use the darker edge of a cake for detail work without all the lighter colours.
Combining Two Split Cakes in One Design
Load two different split cakes on two different brushes and alternate them in a single design. This technique allows you to use warm tones for one element (petals) and cool tones for another (leaves) within the same design, without cross-contaminating the cakes. Many of Leanne Courtney's signature designs use two or three cakes working together.
Rotating the Brush Mid-Stroke
For designs where you want the colour orientation to change direction — for example, where one side of a butterfly wing has purple at the top and the other has purple at the bottom — you can rotate the brush before each stroke. This is a more advanced technique that takes practice but significantly expands the range of effects you can achieve.
Using the Flat Edge for Leaf Work
The thin edge of a flat brush loaded on a split cake produces a very fine line with colour variation — ideal for stems, veins on leaves, and fine detail. Press the very tip of the flat edge to the skin and drag for a thin, multi-coloured line without any additional brush change.
Picking Up Single Colours from Worn Edges
As a split cake wears down, the outer edge colours are often the last to run out. A small round brush dipped into the corner of a nearly-finished split cake picks up a single colour that can be used for outlines or detail work — an efficient way to avoid waste and extend the value of each cake.
Caring for Your Split Cakes
| ✅ Do | ❌ Don't |
|---|---|
| Wet your brush before touching the cake — always activate via the brush, not the cake | Pour or water directly onto the cake surface — this causes waterlogging and colour bleed between bands |
| Keep the lid closed between uses — prevents dust contamination and maintains surface quality | Leave the cake open during breaks — even a short time exposed at a dusty outdoor event degrades the surface |
| Store in a dry, temperature-stable location away from direct sunlight | Store in extreme heat, humidity, or cold — though cakes will recover once conditions normalise |
| Scrape the top layer with a clean spatula if the surface becomes grey or contaminated — fresh paint is just beneath | Touch the cake surface with bare fingers — skin oils and bacteria break down the paint surface over time |
| Use within 12 months of opening for best performance and hygiene (Fusion Body Art recommendation) | Continue using a cake that smells off or has visible mould — discard and replace |
Split Cakes vs Solid Colours: When to Use Each
| Use Split Cakes When... | Use Solid Colours When... |
|---|---|
| You need speed at high-volume events | You need a single flat colour as a base |
| The design has natural colour gradients (petals, wings, scales) | You are doing detailed linework or outlines |
| You want multi-colour effects without blending time | You need a very specific colour not available in split cake form |
| The client wants a "wow" effect from watching you paint | You are painting a design that requires precise colour control |
| You are working a market stall and earning per face | You are painting a slow, detailed theatrical or competition design |
In practice, most experienced face painters use split cakes and solid colours together in the same design — split cakes for the large coloured elements and solid colours (usually a solid black and white at minimum) for outlines, highlights, and detail work.
Frequently Asked Questions
What is a split cake in face painting?
A split cake is a face painting cake containing multiple colours arranged in parallel bands within a single container. When a flat or angle brush is swept across the surface, it picks up all colours at once, allowing multi-colour designs to be painted in a single stroke. They are also called one stroke cakes.
How do you use a split cake for face painting?
Dampen a flat or angle brush and blot off the excess water until the bristles are damp but not dripping. Sweep the brush back and forth across the surface of the split cake, moving across the full width of all colour bands, until the paint builds to a creamy, even consistency on the brush. Apply to skin with smooth, confident strokes. The key variables are brush dampness and consistent loading technique — too much water muddies the colours, too little prevents transfer.
What brush do you use with a split cake?
A 1" flat brush is the most versatile starting point for split cake work and is recommended for beginners. A ¾" flat or angle brush gives more precision for smaller designs. Petal brushes produce distinctive shaped strokes ideal for flower petals and leaves. The brush should span the full width of the split cake so all colour bands are loaded simultaneously.
Why do my split cake colours turn muddy?
Muddy colours are almost always caused by too much water on the brush. The excess water causes the colour bands to bleed into each other before the paint reaches the skin. Fix it by blotting the brush more firmly after dipping — the bristles should feel damp, not wet — and doing a test stroke on the back of your hand before applying to a client's face.
Can you use a sponge with a split cake?
Yes — Fusion Petal Sponges work particularly well with split cakes. Press the flat face of the sponge across all colour bands to load it, then stamp firmly onto the skin and lift cleanly. Each stamp produces an instant petal or wing shape with built-in colour graduation. Use one sponge per split cake to keep colours clean. The result is a defined, multi-colour shape produced in a single press — faster than brush technique for designs like butterfly wings and flower petals.
What is the difference between a split cake and a one stroke cake?
The terms are often used interchangeably, but technically a split cake refers to the multi-colour pan itself, while one stroke refers to the painting technique — applying multi-colour designs in a single brush stroke. One stroke cakes are typically slightly narrower than split cakes and designed for use with ¾" brushes, whereas split cakes are wider and suit 1" brushes. In practice, most face painters call all multi-colour pans "split cakes" regardless of size.
How do you stop split cake colours from bleeding into each other on the cake?
The most common cause of colour bleeding on the cake surface is applying water directly to the cake. Always wet your brush before touching the cake — never pour or spray water onto the pan surface. If the surface has gotten wet and colours have started to bleed, let the cake dry completely before using it again.
What designs can you do with a split cake?
Split cakes are particularly well-suited to flowers and petals, butterfly wings, rainbow crowns, animal stripes and scales, eye masks, and cheek art designs. Any design that benefits from natural colour gradients — where a single element moves from one colour to another — is a strong candidate for split cake technique. They are also excellent for any design where speed matters, as a well-loaded brush can produce a complete multi-colour element in a single stroke.
How do you clean a split cake?
Split cakes do not require washing the way brushes do. If the surface becomes contaminated or grey from previous sessions, use a clean spatula or the back of a brush handle to scrape off the top layer and expose fresh paint beneath. Never pour water on the surface to clean it. Keep the lid closed between uses to prevent dust contamination.
Are Fusion Body Art split cakes good for beginners?
Yes — Fusion Body Art split cakes are well-suited to beginners because the colour bands are firm enough to hold their separation on the brush rather than immediately bleeding together, which makes the learning process more forgiving. The wide range of colour combinations also means beginners can achieve impressive results quickly by simply choosing a cake that suits the design they want to paint and following the loading technique above.
How long do Fusion split cakes last?
Fusion Body Art recommends using their split cakes within 12 months of opening for best performance and hygiene. Stored correctly — in a cool, dry location away from direct sunlight and extreme temperature changes — they maintain their colour quality and consistency well throughout this period. A single 30g split cake can produce a very large number of designs; for active face painters, the limiting factor is typically the cake wearing down through use rather than age.
Shop Fusion Body Art Split Cakes
Fusion Body Art's split cake range includes collections designed by world-class artists Leanne Courtney and Elodie Ternois — colour combinations developed specifically for real event painting, in palettes that suit the most popular children's and adult designs.
Fusion Body Art Split Cake Products
Professional-grade, cosmetic-compliant split cakes and palettes trusted by face painters worldwide:

→ Fusion One Stroke Palette – Rainbow Paradise — Twenty-four split cakes. The most comprehensive one stroke palette in the Fusion range.
→ Fusion Unicorn & Fairy Face Painting Kit — A themed kit with split cakes perfect for children's birthday parties and princess designs.
→ Fusion Pro Face Paint Kit — The complete professional starter kit including split cakes, solid colours, and brushes.
→ Fusion Body Art Professional Brush Set of 6 — Includes the ¾" and 1" flat brushes essential for split cake work.
→ Browse the full Fusion split cake range at fusionbodyart.com


