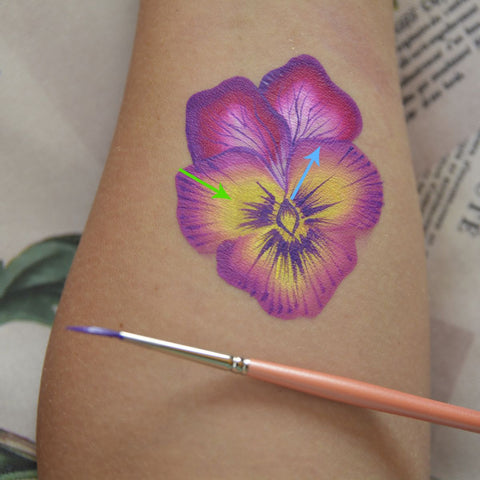
Girls often ask for a flower designs, but roses and flowers in the double-dip technique are very common in tutorials, so we decided to show you how to create a delicate and simple design of violets. This drawing will appeal to any girl.
Step 1 I start our flower design with the lower violet petals. To do this, I use a medium-sized corner brush and the "Spring Fairy" cake from Leanne's Pretty Rainbow Palette. A darker shade of colour purple I placed on the outside of the petal shape to create a 3D effect and try to bring the colors as close as possible to the real flower.

Step 2 Next, I will use warm yellow-pink shades of the "Rainbow Flower" cake from the same palette. Do not use a lot of water, the brush should be slightly squeezed out of the water before use, so that the colours in the cake do not mix and do not spoil the design, neat transition from yellow to purple. Know let's draw three more petals, they overlap those petals that I already drew earlier. The bottom petal is the largest of all, it was the last one I drew. If the center is empty, fill it with the color and the corner of the brush.


Step 3 Use any dark purple colour from the palette to create streaks in the petals. Use the thinnest brush in your collection. On the upper petals, I draw lines from the middle to the edges. On the lower petals there are two types of veins - internal, I draw them from the middle, sharply swiping the brush and create a denser colour. In the picture, I showed them with a blue arrow. And for the second veins (shown by the green arrow), on the contrary, I draw thin lines from the edge to the middle, and also use a little less water, so that the line is clear and does not blur.

Step 4 Using the corner brush and the "Secret Garden" cake, I create green leaves, as well as a darker shade on the outside of the leaf to create a 3D effect. I drag a little with a brush for the wavy edges. You should try to carefully draw the leaves so that the green color does not overlap with the purple. Any errors can be erased with a wet cotton swab so don't panic if you get it wrong.

Step 5 The most interesting thing is the white outline and teardrop lines, patterns. All this makes our design more bright, beautiful and interesting. To do this, you can use the white colour from Leanne's Pretty Rainbow Palette. Or you can take separately Fusion Body Art Face paint Prime Paraffin White. This colour is very dense and fits well on the skin, overlapping the lower colours. I had a lot of favourites in white paint brands, but Fusion Body Art surpassed them all! With a thin brush, I circle the entire drawing, slightly separating the petals from each other. As you can see in the photo, I draw an outline with different line thicknesses, going from a thin to a thick line. All this helps to create a more natural, natural effect. If you make the lines the same thickness, the drawing will be too decorative, unnatural. I add teardrop-shaped lines and curls to the top and bottom, and I lengthen the drawing on my hand vertically. If you decide to draw this design on the side of the face, then wrap the curls and lines above the eyebrow and under the eye, so it will look elegant and harmonious. At the end, add a few stars and dots, and add a little flicker. You can also decorate your design with sequins or glitter gel, and the drawing will Shine even brighter!


I hope you like my design and have fun trying it yourself
Materials I used:
Leanne's Pretty Rainbow Palette
Fusion Body Art Face Paint – Prime Paraffin White
- Medium-sized corner brush
- Round thin brush
- Round brush 3
My name is Natalia, I live and work in Russia, the city of Yaroslavl. I have won many face painting contests and now I want to teach you how to create beautiful drawings on faces. The most beautiful thing when you show your child the finished picture to see his shining smile.
Follow me on Instagram | Follow me on Facebook | Follow me on YouTube
Sneak Peak of my next design to show you all


